Step 1: When you log into BLISS, you will
land on your portfolio page, as shown below. Click on the company for which you
want to create the Agenda.
Step 2:
Click Agenda
Step
3: A
drop down menu with 3 categories of meeting will be displayed- Board Meeting,
Sub-committee meeting and Shareholder meeting. Select the preferred option by
clicking on it.
Step 4:
Once you select the type of meeting in the next screen you have a ready to use
Agenda templates with Pre-Populated Agenda items.
Note: The Agenda
for meetings is prepopulated with the agenda items as required by the
Secretarial Standards and/or the Companies Act, 2013
Step 5: Choose the required new agenda items
from the pre-drafted library using this Search option by entering the key words
–like KMP appointment, share allotment or opening a bank account, as the case
maybe.
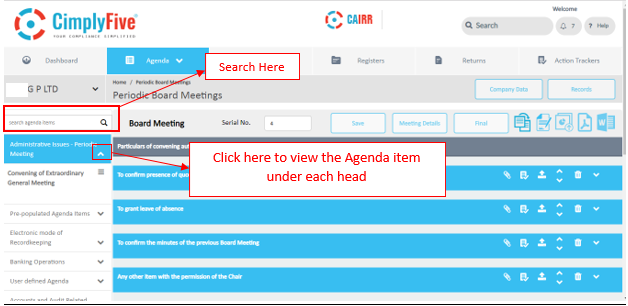
Step
6: Once an Agenda item is chosen, drag and drop the
required agenda items from the left-hand side of the screen to the center of
the screen as shown below. The items which dragged and
dropped will appear as the last item.
Step
7: Check the prefilled Serial No. for the Meeting
and make changes if required and Click Save.
Step 8:
Please select “Ok” on confirmation pop-up box.
Step 9:
Click Meetings details.
Step 10: Fill in the information required like Meeting venue, Notice Publish Date,
Meeting Date, Meeting start time, Conference facility available
1. Meeting Venue The Registered office of the Company comes pre-filled as the default venue.
2 Agenda Notice Date It is the date of circulating the Notice.
3. Meeting Date This the date on which the meeting will take place.
4. Start Time This is the time when the meeting shall start
5. Conference Available This check box when selected, it would ask for for the Conference number and the video link for the meeting.

Please note, If the time gap between the Agenda Notice Date and the Meeting Date is less than 7 days then BLISS will ask you to confirm if the meeting to be titled as “Meeting called at Shorter Notice”. With two options ‘cancel’ or ‘ok’
- If clicked cancel- You can change the Meeting dates
- If clicked ok- Your Agenda gets created with Meeting called at shorter notice as the title
Step 11: Where required you can click on ‘Add Invitee’ button by adding Invitee Name, Role, Name of Organization Represented which are mandated by Secretarial Standards.
Step 12:
After filling all the details Click Save.

Please note the Directors name appear from Company Profile and Register of Directors and KMP. If any discrepancy check Register of Directors and KMP.

You can click on the

button to upload up to 50 different pdf files of 10 MB each against each agenda item as attachments. On doing so a success message appears for the upload of files. Once uploaded, the color of the icon will change from

to

.The grey indicates that there is a document attached to the item.
When attachments are uploaded against an agenda item, the option “Attached as Annexure” in the

icon will get selected automatically. In case you don’t want the uploaded attachments to form part of the agenda document, click on the
icon and change it to “Will be tabled at the meeting”.
You can also re-arrange the attachments in any order after upload by dragging them up or down to the desired position as shown below:
Step 13: The draft of Agenda is ready. You can view the draft by either clicking on Word/Pdf Icon OR Agenda annotation button.
Note: You can view the annotated version (containing the public comments made by the secretarial team) of the document as it were to appear in the output/to the Director, as an alternative to downloading the pdf or word version of the Agenda.
As and when you make changes to the content, you can also keep refreshing the tab in which the annotator has opened so that you will be able to view the updated agenda.
Step 14: On click of the Pdf Print button a Modal appears select appropriate print
options and click on Print
Note: For print in Word the option of printing with attachment is
not available
1.
| Generate
Letterhead
| If opted
for this option, the Agenda will appear with a default Letterhead
|
2.
| Print
Agenda Table
| If this
option is switched off then the Agenda will appear without the reference to
the annexures
|
3.
| Print with Attachments
| If opted
for this option, the Agenda will get printed with the attachments that is
uploaded for each agenda item.
|
Note: For print in Word the option of printing with attachment is
not available
Step 15:
After the draft of the document is circulated and confirmed. Click on Final,
reconfirm the Meeting Details and the Agenda gets finalized.

Agenda created in BLISS has three
modes Save, Final and Archive. On Archiving a Agenda you cannot modify it post
that.


